Game Development and Coding 20 March 2014 – Tutorial Waves

Tutorial Waves

It’s usually a good idea to introduce the different elements of your game gradually over time rather than throwing everything at the player from the very start. That way the player will get acquainted with the controls as well as the different enemy types and their different behaviors.

Our tutorial consists of five waves. The first four introducing the different enemy types and the last introducing a combination of these before the game proper starts. Each wave has a three second interval between them. The next wave will spawn even if the previous has not been defeated. The reason for keeping the waves so frequent is to keep down the time of the tutorial as well as set the pacing of the game already in the tutorial, even if it starts out a little slower.

So how did I implement these waves? I made the game state update method call on the method “Tutorial” when the game started. The game knew to only call on the “Tutorial” method because a Boolean (variable that can only be true or false) named “m_tutorialState” is set to “true”. The “tutorial” method counts down a “tutorial timer”, and when that timer reaches zero, “m_tutorialState” is set to “false”. When “m_tutorialState” is “false”, the game states’ update method calls on the method “RealTime”, which contains the code for the regular gameplay, instead.

Tutorial Waves

The “Tutorial” method then spawns a preset number of enemies at three second intervals. The same timer used for this is the same timer used to determine when the “m_tutorialState” Boolean should be switched to false. Each wave has its own Boolean variable as well, that is switched to “true” as soon as it is spawned the first time, which prevents it happening again. The code looks like this:

If (m_wave == false && m_tutorialTimer >= 3.0)

{

m_wave = true;

m_entitiyManager->AddEnemyAOE(m_spawnerAOEenemy->Spawn());

}

The reason for using Booleans here as well is because if you try to make it happen between, say, 3.0 and 3.1 seconds, then there is a good chance it will happen more than once because each loop has a very short duration. You could try to counteract this by making the step smaller, for example between 3.0 and 3.01. The problem with this is twofold. First off, if you make the step too small then this wave will most likely be skipped over. Second, each waves’ duration varies, making it even harder to make an interval in time that will only happen once. Better to use Booleans as a form of “lock” on the if-statements.

Cheers!

Game Developement and Coding 13 March 2014 – Entity Manager

The Entity Manager

The entity manager is a class that makes sure all objects (or entities) in the game space are updated and displayed on the screen properly.


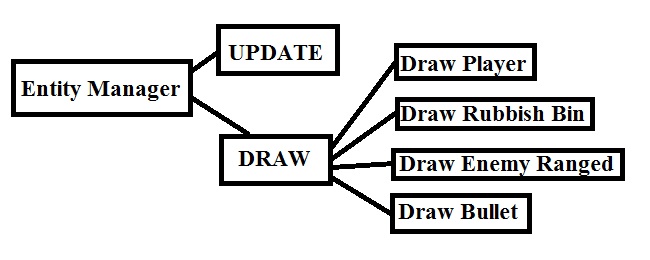
The entity manager can be divided into five parts:

-Add pointers to objects and store them in vectors.

-Update all the objects via their pointers.

-Draw all objects via their pointers.

-Make sure all objects are added to the collision check.

-Check the HP of all objects and delete those that have reached zero or lower.


It stores pointers to each class of object in a separate vector container. For example all rubbish bin pointers are stored in the vector “m_rubbishBins”. Sorting them this gives me some extra control.

I can make sure that the program does not try to update or draw something that does not exist by checking first to see if the container is empty or not. I can also adapt the way each class of object is updated and drawn to suit their needs. For example, most objects only needs a pointer to the rendered window to be drawn, but the rubbish bin also needs to know the players turn angle in order to know its own sprites’ turn angle in case it is knocked over.

New objects are added to their respective vector containers by using their own add method, for example “AddRubbishBin” that only takes in pointers to rubbish bins. The method only takes in pointers to the objects created by the right “Spawner”, for example “AddRubbishBin” only takes in pointers made by the class “SpawnerRubbishBin”.

The objects are then updated in their separate update method that goes through the vector of pointers. This means you can adapt what kind of parameters are used in the different update methods rather than storing them all in the same vector and check each and every one which type they are and then update accordingly. It also means that if something happens in the update that should make something else spawn, for example a bullet from a ranged attack, it can be fixed right in the same update method.

Placing the updates in their own methods means you can change their order a lot easier. For example, if I discover that the player needs to be updated before any enemy I can simply move the “UpdatePlayer” method to a different place in the Entity Managers’ update rather then move around all the code that goes through how to update the player depending on user input.

1 entity manager update

The separate draw methods are built pretty much the same way as the update methods, for the same reasons, only difference being that in these methods the objects gets drawn to the rendered window.

2 entity manager draw

The entity manager also makes sure pointers to all the objects get added to the collision manager so that proper collision detection can be made by the application.

Lastly, the entity manager goes through all vectors, checking all the objects via the pointers in them, to see if their HP. If the HP is 0 or less, the object gets deleted and, in some cases, gives the player a score point.

Game Developement and Coding 6 March 2014 – Rubbish Bin Class

Rubbish Bin Class.

Might not sound all too exciting, but rubbish bins in our game space play an important role for the game play. They can be knocked over by the player and when this is done a power up might spawn by the bin. Otherwise there will only be trash coming out of it.

The basics of the class were simple enough to code. I simply made a new class type with its own sprite, collider (for checking collisions) and variables, like speed. The problem lay in displaying the “knocked over”-animation when it was hit by the players’ attack, making it fall away from the players’ position as well as give proper coordinates for where to spawn the trash, alternatively the power up.

Starting with the “knocked over”-animation I gave the class a Boolean variable (a variable that can only be “true” or “false” ) called “m_death” that is set to “false” when the object is made, but changes to “true” when the object is struck by the players’ attack.

What happens then is that the object is drawn using a separate sprite for the “knocked over”-animation rather than its regular sprite. However you don’t want the rubbish bin falling over time and again. In order to prevent this, and only make the animation run once, the animation loop is made so that when the last frame has been reached it is reset, but not at the beginning. It is reset at the last frame of the animation meaning it will only show that from then on.

1 - Spritesheet and coords animation loop extended

Rotating the sprite to make the rubbish bin fall away from the player first proved to be a bit of a problem. The rotation of the player is dependent on a variable called “m_angle” which changes depending on the keyboard input. For example, if the input is “up” and “right” the “m_angle” becomes 45. This variable is then used with SFMLs’ rotation function, meaning the player sprite is turned 45 degrees when the “up” and “right” arrows are pressed.

When the rubbish bin is knocked over, I send in the same value as “m_angle” to the rotation function used on the rubbish bins’ sprite as well. However, since this happens each update, the knocked over rubbish bins kept on turning as the player avatar was turned in subsequent frames.

The solution to this was to give the Rubbish Bin class another Boolean called “m_knockedOver” that is set to “false” when the object is created. Then the rotation of the sprite is set within an if-statement that is only executed while the “m_knockedOver” is “false”. When the rotation is applied for the first time the “m_knockedOver” is also changed to “true” in the same if-statement, meaning it will never be rotated again.

The same “m_angle” variable was also used to determine where the rubbish/power up should spawn. If the bin fell to the left, in other words if the bin had the angle value of 270, then the spawn point should be placed to the left of the bin. This was done by sending the angle value into a method that then added numbers to the bins’ location depending on the angle value. For example, if the angle value sent into the method was 270, then the bins’ location had its x-value decreased but its y-value unchanged in order to move it to the left of the bin.

2 - angle and rotation

The “POW” sprite is a placeholder for the rubbish sprite.