Post BGP 2015 – What went wrong (part one)

Hello!

I think I’ve been pushing this in front of me long enough now. This will be a bit uncomfortable for me to write about, but it needs to be done. Hopefully I can help someone avoid at least some of the mistakes that I and my group made during this project.

Lone programmer

The first thing I’d like to bring up is the fact that I was the only programmer on the team for most of the project as the only other coder unfortunately had to leave the team at the start of week three. The obvious problem with this is that I now had roughly twice the amount of work to do but no extra time.

Another problem that might not be quite as obvious (and a bit more difficult to explain) is the fact that I also had to plan the structure of the code all by myself. This meant that I could not focus my efforts entirely on what I was coding at the moment. I had to keep the entire code structure in the back of my head at all times, as well as the fact that I had to do all of it. Whenever I was working on one part of the code, say the movement mechanics, there was no progress at all in any of the other parts.

Yet another problem with being the only programmer is that you don’t really have anyone to discuss coding solutions with. You lose a lot of potential feedback. There were other groups of students that I talked to on occasion though. We also had something called quality time every week where I would meet one of the programming teachers and discuss development issues and potential solutions. This helped out a lot. In hindsight I wonder if I should have put more time into discussing code with students in other work groups.

Lastly, the fact that I became the only programmer in the group without warning also made things harder, as I had little time to adjust my code planning.

Bad pipeline

Before moving on I would like to point out that the pipeline I am talking about was my group’s production pipeline, not to be confused with other pipelines such as Unity3D’s rendering pipeline (http://docs.unity3d.com/Manual/SL-RenderPipeline.html).

The main problem with our production pipeline was that roughly half of the group’s members were not connected to the project’s source control until there was only one or two weeks of production left. Some didn’t even have the Unity3D engine installed on their computers until then.

This meant that whenever an art asset was made it had to be added to the game through me, which took time and focus away from programming. It also meant that if there was something odd with the asset when imported to Unity3D it either had to be fixed in-engine (by me once again) or I had to tell the other group members this after which another asset was made and then sent to me so I could import it once again.

This is obviously a very sub-par production pipeline, especially considering that I really needed to focus on coding. Once we got a proper source control going things went much smoother, but it was a bit too late to save the project unfortunately.

That is all I have for now. Part two should be up in a day or two if everything goes well.

Cheers!

BGP 2015 – sixth week: Development issues

panic-buttonZ3

Hello!

This week I started by giving the camera some simple movement behavior. Basically I make it follow the player’s position (with a certain offset) and rotation though somewhat slowly so that it’s movement becomes more smooth rather than sudden and jerky. I am mainly making use of ‘Slerp’ and ‘SmoothDamp’ for the camera’s movement.

I’ve also managed to get the direction correction for the movement to work as intended. What I had missed was that I needed to make use of conversion between local space and world space in the engine.

Burning Steel Player Movement Revision (2015-05-08 (2) (3)

Here is a copy of the sample code if it’s hard to see:

  1. // C# / UnityScript
  2. var yVel = rigidbody.velocity.y;
  3. var localV = transform.InverseTransformDirection( rigidbody.velocity );
  4. localV.x = 0.0f;
  5. localV.y = 0.0f;
  6. var worldV = transform.TransformDirection( localV );
  7. worldV.y = yVel;
  8. rigidbody.velocity = worldV;

Taken from:

http://answers.unity3d.com/questions/412078/keeping-forward-velocity-always-in-the-same-direct.html

Lastly I encountered a problem with the rotation boxes (triggers that will rotate the player automatically, but only in the x-axis and z-axis) when they are used in the actual level we were going to use for the Beta.

For some reason they stop working properly when their local z-axis is aligned with the world y-axis. I thought I could fix this by making use of local rotation values just like I did with the movement but it ended up making things worse as all rotation boxes  regardless of placement stopped working properly.

Worst case scenario we will have to move on without any automatic rotation as there isn’t much time left.

Cheers!

BGP 2015 – fifth week: Trouble with player movement.

20863_warning_signs_Page_65

Hello!

This week I’ve mainly been working on the player movement. I tried making it more controllable by the player. This was done by changing the direction of the rigidbody’s velocity to a forward vector multiplied by the magnitude of the old velocity. However this meant that the parts of the velocity that made up movement other than acceleration, such as jumping or strafing, also became a forward vector. As such jumping, strafing, tackling and gravity was ruined, but the player did get better steering control over their vehicle. By drawing mind maps of the movement function and analyzing it, I tried to get the redirection of gravity apply to acceleration only while the other velocities, such as jumping and  strafing, were unaffected.

Player Movement Burning Steel 2015-05-07 Before Analysis

Player Movement Burning Steel 2015-05-07 First revision

In the end, however, it turned out that using the old movement (without the redirected acceleration) with a largely increased drag on the rigidbody, from 0.5 to 2, worked better as it also gave the players control without affecting the gravity, jumping etc…

The big question now is which form of translation the movement should be made up of, by adding forces or affecting the rigidbody’s velocity directly? Add force might be the better alternative as using that means I will interfere less with Unity3D’s own physics engine, but I need a proper level to test the movement on now.

Cheers!

BGP 2015 – fourth week: loops, turns, rotations & illness

98f9148accd765ffd0e6d2dc052c83e05805138b05f5f85f462c6fb0413ef731
Hello!

This week has been pretty bad for me because I’ve been ill for the most part and as such have not been able to work as much on the project. It really does wonders for your stress levels.

I have been able fix the custom gravity effect for loops and turns by making prefabs that are essentially trigger boxes that apply a gravity effect on any players within them. The direction of the gravity effect is determined by the rotation of the object itself (which is invisible), or rather the direction of its local y-axis is the inverse of the gravity direction. This way anyone, not just programmers, can place and manipulate the custom gravity by rotation the objects and transform their trigger colliders. Indeed, they could even replace the box trigger colliders with trigger colliders of different shapes if they so desire, what’s important is the game objects rotation and that it has the gravity script attached to it. The script also has a public variable for multiplying the gravity strength if the need should arise.

loopGravityBox

This way it is possible to place several gravity objects with different rotations along the turn or loop in order to make it’s custom gravity.

loopGravityBoxes

I’ve made a similar type of game object that takes care of rotating the player as the level twists and turns as the players are not to be able to pitch or roll when on the track. They work in principle the same way as the gravity objects except they affect the players rotation instead. The rotation is handled by an individual type of object since the rotation and gravity direction don’t always coincide, they need to be independent of each other. Compare the image below that shows the rotation boxes for the loop with the image above that shows the gravity boxes for the same loop.

loopRotationBoxes

I’ve also managed to clean up some of the code. Previously the input form players and the player movement was in the same script so I had to make one for each player. Now those are separated, which should help make things easier from now on, at least when developing the player prefabs.

Cheers!

BGP 2015 – thrid week: minor crisis & Pre-Alpha

panic-buttonZ3

Hello!

This week the only other programmer in our group had to drop out due to personal reasons. This left us in a minor crisis since I am the only programmer in the group now, though one of the other team members know some basic C# scripting in Unity3D which will hopefully help me somewhat. The focus this week was to get a pre-alpha build ready for play testing.

I’ve abandoned using ‘actual’ hovering on the vehicles for now in favor of a collider placed under the actual game object to make it appear to be hovering. After some iteration it turns out a cylindrical collider with locked rotations seem to work the best.

BurningSteelCapsuleCollider

BurningSteelFreezeRotation

This includes moving between track pieces of different rotation.

GravityDemo01

GravityDemo02

I was going to try and implement a spline editor following a tutorial I found, but there is no time for that now. Instead I focused the last days of the week on making the alpha playable for two people on split screen using a game-pad each.

BurningSteelPreAlpha

Cheers!

BGP 2015 – Second week: Swithcing to Unity3D 5 & First playable

unity3d1

Hello!

This week we decided to switch to the Unity3D engine. The reason for doing this was because we programmers could not find a way to make a custom gravitational effect work with the player movement because of how Unreal handles forces in relation to character controllers. We programmers were also inexperienced with the Unreal engine, which was also a factor.

We do both have experience with working in the Unity3D engine however, so after talking to the rest of the group about it the switch was made.

Unfortunately the other programmer in the group came down with the sickness so it fell to me to make the new gravity work as well as the input and movement mechanic for the game as the deadline for our first playable was this Friday.

The road segment that the player is pulled towards via the gravity effect is determined by trigger colliders. This currently has a problem whenever triggers overlap as the game switches to its default gravity whenever a road segment’s trigger collider is exited.

Through iteration I was able to create a finally create a gravity effect on road segments by taking their Transform.up vector and inverting it. This way it does not matter which way the road segment is turned or rotated, as long as the player is on the right side of it and close enough to it there will be a gravitational pull towards the current road segment.

I still do not know how to handle road pieces that curve tough I am thinking about attaching invisible objects to the road segments and using them as the gravitational center instead of a Transform.up vector.

Using a raycast straight down from the player to determine if there is a custom gravitational pull would be an alternative were it not for the fact that players that are rotated the ‘wrong’ way should still be affected by the gravitational force as long as they are close enough to the road segment.

ProjectSteelFirstPlayableScreenshot

As it stands a first playable is done, however the gravity effect and movement still needs more work.

Cheers!

BGP 2015 – First Week: Learning the Unreal 4 Engine

unrealengine4logoHello!

This week I’ve been doing research on the Unreal 4 engine. This is the engine that will be used to make our game, so I’ll need to be as familiar with it as I possibly can, at least the scripting part of it. The game my group is making is a racing game that takes inspiration from F-ZERO, Wipeout and Distance.

I started out learning about blueprints and how they can be used. Blueprints are a visual form of scripting built into the Unreal Engine. It can be combined with normal scripting in C++ and indeed any script you make in code can be made callable in blueprints. I learned about blueprints mainly from tutorials and documentation on https://www.unrealengine.com/. It took a while to get used to but after roughly a days work I started to feel comfortable with how the blueprints worked.

I then moved on to trying to learn how to make functions in C++ scripting that could also be used as nodes in the visual blueprint scripting. It took quite a lot of effort since most tutorials and documentation on the subject, be it official or not, said pretty much the same thing. They stated that all that was needed in order to make a function callable in blueprint was to write UFUNCTION(BlueprintCallable) just before the function declaration.

Like this:

//Fire a Weapon

UFUNCTION(BlueprintCallable, Category=“Weapon”) void Fire();

(example taken from https://docs.unrealengine.com/)

However this did not work for me and I could not figure out why. Eventually, after a lot of searching online and asking fellow students about it, I stumbled upon a post in a forum where a person described the same problem. Turns out that, in some cases at least, you need to restart the Unreal Editor in order for the functions you’ve made blueprintcallable to show up. For some reason, this was NOT in the official documentation.

Once this was sorted out and making functions that were blueprintcallable no longer posed a problem I started making sample projects following tutorials for making racing games as well as downloading and going through sample racing game projects for the Unreal Engine. I was mostly focused on how to code input, either in C++ or blueprints, and what kind of  movement system should be used for our game.

At first I was considering using the vehicle movement that is built into Unreal 4 but it is meant for wheeled vehicles and seems to need to be attached to an object with a model that has four wheels. In the racing game we’re making the vehicles are supposed to be hovering pods powered that are propelled by rockets or jet engines. With some research i found out that there is a type of component in Unreal, called physics thruster, that can be attached to an object to propel it. This worked out somewhat well, I could attach thrusters to an object and bind their activation to player input. However, with this I was not sure how to measure the speed of the object or how to control the acceleration and max velocity. In addition, for each pod vehicle we made we would have to physically place the thrusters and give them a suiting force. If their placement is off, then so will the thrust be. So I looked around some more.

Eventually I discovered that the component for regular character movement has some variables for deceleration and ground friction that I could manipulate in order to make the movement seems less like walking and more like driving. With this I actually can control things like acceleration, max speed etc. Though it still requires some work, this seems to be the movement model we will make use of for our game. The next step will be to start building our first playable.

Cheers!


BGP 2015 – Initial Post

Hello!

This is my initial post for Big Game Project (BGP). First order of business is to start researching the Unreal 4 Engine and start working on a first playable.

I am part of the team for Project Steel, a racing game project.

My role in the project is AI programming, though development for AI won’t start until we have our first playable. Until then I am a general programmer.

I will be posting updates on my progress at least once each week.

Game Development and Coding 20 March 2014 – Tutorial Waves

Tutorial Waves

It’s usually a good idea to introduce the different elements of your game gradually over time rather than throwing everything at the player from the very start. That way the player will get acquainted with the controls as well as the different enemy types and their different behaviors.

Our tutorial consists of five waves. The first four introducing the different enemy types and the last introducing a combination of these before the game proper starts. Each wave has a three second interval between them. The next wave will spawn even if the previous has not been defeated. The reason for keeping the waves so frequent is to keep down the time of the tutorial as well as set the pacing of the game already in the tutorial, even if it starts out a little slower.

So how did I implement these waves? I made the game state update method call on the method “Tutorial” when the game started. The game knew to only call on the “Tutorial” method because a Boolean (variable that can only be true or false) named “m_tutorialState” is set to “true”. The “tutorial” method counts down a “tutorial timer”, and when that timer reaches zero, “m_tutorialState” is set to “false”. When “m_tutorialState” is “false”, the game states’ update method calls on the method “RealTime”, which contains the code for the regular gameplay, instead.

Tutorial Waves

The “Tutorial” method then spawns a preset number of enemies at three second intervals. The same timer used for this is the same timer used to determine when the “m_tutorialState” Boolean should be switched to false. Each wave has its own Boolean variable as well, that is switched to “true” as soon as it is spawned the first time, which prevents it happening again. The code looks like this:

If (m_wave == false && m_tutorialTimer >= 3.0)

{

m_wave = true;

m_entitiyManager->AddEnemyAOE(m_spawnerAOEenemy->Spawn());

}

The reason for using Booleans here as well is because if you try to make it happen between, say, 3.0 and 3.1 seconds, then there is a good chance it will happen more than once because each loop has a very short duration. You could try to counteract this by making the step smaller, for example between 3.0 and 3.01. The problem with this is twofold. First off, if you make the step too small then this wave will most likely be skipped over. Second, each waves’ duration varies, making it even harder to make an interval in time that will only happen once. Better to use Booleans as a form of “lock” on the if-statements.

Cheers!

Game Developement and Coding 13 March 2014 – Entity Manager

The Entity Manager

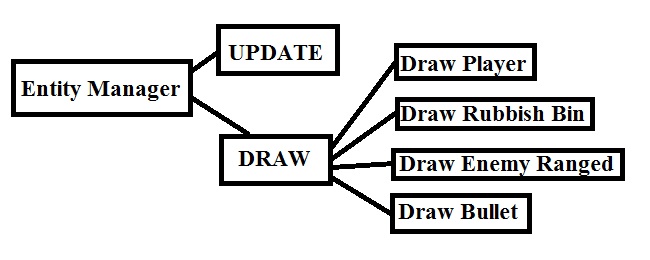
The entity manager is a class that makes sure all objects (or entities) in the game space are updated and displayed on the screen properly.


The entity manager can be divided into five parts:

-Add pointers to objects and store them in vectors.

-Update all the objects via their pointers.

-Draw all objects via their pointers.

-Make sure all objects are added to the collision check.

-Check the HP of all objects and delete those that have reached zero or lower.


It stores pointers to each class of object in a separate vector container. For example all rubbish bin pointers are stored in the vector “m_rubbishBins”. Sorting them this gives me some extra control.

I can make sure that the program does not try to update or draw something that does not exist by checking first to see if the container is empty or not. I can also adapt the way each class of object is updated and drawn to suit their needs. For example, most objects only needs a pointer to the rendered window to be drawn, but the rubbish bin also needs to know the players turn angle in order to know its own sprites’ turn angle in case it is knocked over.

New objects are added to their respective vector containers by using their own add method, for example “AddRubbishBin” that only takes in pointers to rubbish bins. The method only takes in pointers to the objects created by the right “Spawner”, for example “AddRubbishBin” only takes in pointers made by the class “SpawnerRubbishBin”.

The objects are then updated in their separate update method that goes through the vector of pointers. This means you can adapt what kind of parameters are used in the different update methods rather than storing them all in the same vector and check each and every one which type they are and then update accordingly. It also means that if something happens in the update that should make something else spawn, for example a bullet from a ranged attack, it can be fixed right in the same update method.

Placing the updates in their own methods means you can change their order a lot easier. For example, if I discover that the player needs to be updated before any enemy I can simply move the “UpdatePlayer” method to a different place in the Entity Managers’ update rather then move around all the code that goes through how to update the player depending on user input.

1 entity manager update

The separate draw methods are built pretty much the same way as the update methods, for the same reasons, only difference being that in these methods the objects gets drawn to the rendered window.

2 entity manager draw

The entity manager also makes sure pointers to all the objects get added to the collision manager so that proper collision detection can be made by the application.

Lastly, the entity manager goes through all vectors, checking all the objects via the pointers in them, to see if their HP. If the HP is 0 or less, the object gets deleted and, in some cases, gives the player a score point.